Pages

Tuesday, November 29, 2016

Nearpod is the place to be

Platform: online-based, but student access it well on iPads

Grade Levels: all, theoretically

Subjects: all

Purpose & Features: Nearpod is the coolest tech platform I've seen this year - it can transform a lesson, it's easy to use, and the students love using it. Let me try to explain it first. It's like Powerpoint on steroids. You can create interactive mobile presentations, interspersing traditional picture/text slides with interactive slides (multiple choice quizzes, free responses, drawing, etc.) where students contribute their input to the presentation. You can choose to broadcast student feedback on a classroom screen for the class to see, or view it themselves as a formative assessment tool. After the presentation, you can go back and view students' responses and see all of the data you gathered from your lesson. You can also have students browse websites and go on virtual field trips in your presentations!

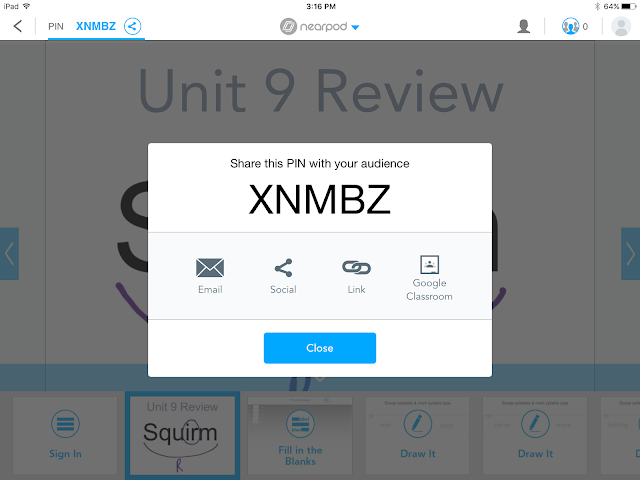
But how does it work? First, teachers sign up for an account - it is free for limited features, or you can pay up for a Gold account (or you can get all the features if your school has an account). You can create your presentation using a very simple interface on the Nearpod website. Students download the free Nearpod and connect to your presentation through a pin number generated by Nearpod, but they do not need to create an account. You can choose two presentation styles for students: "Live lesson," which means you control the pace of the slides or "Student-paced," which means that students control the pace of the slides. "Student-paced" is an excellent choice for a make-up lesson, independent work time, or even homework.

Screenshot of a new lesson canvas. You can add slides manually, or import PowerPoint slides, photos, or PDFs to create your presentation.

You can add content like a traditional slide, or try out the new 3D models, virtual field trips, or Sway presentations through your Microsoft Office 365 account.
Share a lesson with a class using a pin. You can see the students who join the lesson and monitor who is following your presentation and who has logged out.

Here are, in my personal opinion, some great things about using Nearpod:

  • Easy to make a presentation - very intuitive online interface.
  • Students can sign in for a live lesson and then you control their activity (you can see from your teacher view when they leave the presentation). This can be a good management tool. Students can also browse a particular website on their iPads within a presentation, but they won't be able to stray from that site.
  • Virtual Reality Fieldtrips are awesome and students love them - I recently used one to get students to help picture the setting of a short story we were reading.
  • Poll activity feature helps provoke discussion (I used a Nearpod to present in a faculty meeting once and teachers asked if we could use it more because the poll feature allowed the group to see everyone's opinions, not just those who talked in the meeting).
  • It's easy to go back and look at report of how students responded to polls, quizzes, open-ended questions, etc.

What have I used Nearpod for, so far?

  • Teaching new concepts and reviewing concepts for a language remediation course
  • Framework for student debate after reading a news article
  • As a comprehension guide for a short story: pre-reading activities, comprehension questions & post-reading comprehension activities
  • Presentation to faculty about Core Apps we're using in our middle school
  • Presentation to parents about iPads

...But Wait! There's More!

Nearpod also features pre-made lessons and academic content, ready for you to use and fully editable. There is a range of content available - at academic levels ranging from kindergarten to adult. Nearpod has also made Common Sense Media's Digital Citizenship curriculum available as Nearpod presentations. Also available: quick icebreaker activities for homeroom, skills introductions and practice in math, social studies lessons using Nearpod's Virtual Reality Fieldtrips, grammar lessons and lessons surrounding a particular text in ELA, and much, much more!

If you have a school license, this content is free. For individual users, some content is free and some requires payment.

A selection of pre-made content in Nearpod's library.


Monday, November 21, 2016

Teaching students to be tech-savvy is also teaching them how to turn off their devices


In time for Thanksgiving, here's a great resource for parents and school communities to consider - it's The Family Dinner Project's "Tech at the Table" page.

Sometimes, the best use of technology at certain moment is putting away the device altogether. I think the mindset behind Common Sense Media's #DeviceFreeDinner Challenge can be applied to school and classroom time as well.

Friday, November 4, 2016

Free Math Manipulative Apps

In my experience, Math apps are plentiful, expensive, and many are of questionable quality. I suspect that some teachers want a math app to use in place of an adequate math curriculum. If only teaching math were that easy...

My math teaching experience is limited, but what I've found is that that iPad touchscreen can be a great environment for virtual math manipulatives. Virtual manipulatives can save time, storage space, money, and the annoying situation of policing students building 10-block towers...

Here are some useful math manipulative apps:


1. Schoolkit Math: This app is simple, straightforward, and good for lower elementary students as well as middle school students. The app contains a wide range of virtual manipulatives, including, but not limited to a number line, counters, hundreds chart, tens frame, clock, money, fraction kit, number houses, dot grid, bar graph, multiplication arrays, shapes, ruler, and algebra tiles. The app also contains a Thinking Journal in which students can explain their thought processes using screenshots from the app or photos from the camera roll. They then can email or print their journals as PDFs.


Screenshot of the money page on Schoolkit Math


2. Math Learning Center Apps: These apps are also simple and great for reinforcing basic concepts visually - probably best for the elementary school set. Their database of apps includes Geoboard (remember the rubber bands and metal pegs of old?), Number Pieces (place value), Number Line, Number Frames, Fractions, Math Vocab Cards, Money Pieces, Pattern Shapes, Number Rack (like an abacus).

They also have web versions of each of these apps!


Screenshot of area calculation on Geoboard


3. Let's Do Maths Dial-a-Fraction: Yes, they're British. The dial-a-fraction feature helps students see how changes in the value of numerator and the denominator change the fraction - good for reinforcing basic fraction concepts. Features in this app are limited and you do need to pay up to use certain features.


4. MathPapa: This app is more for middle school teachers since it's all about algebra. Students type in an algebra problem and the app will solve it and show the steps its takes to solve it. This is a great tool for checking work and a good homework resource. You need to pay for the "pro" version to remove the ads.


5. Virtual Manipulatives: This app contains manipulatives for fractions, decimals, and percents. It allows students to quickly see equivalents. Students can draw on the board to label elements or work problems and then save their board as a picture in their photos. This is definitely an app that you need to explicitly teach students how to use and is probably best used in class for specific lessons.


Screenshot of the features of the board - pieces are also available for decimals and percents


Sunday, October 30, 2016

Using Inspiration Maps to help struggling writers organize their thoughts

Platform: iPad - free version & paid app (currently $9.99)

Grade Levels: 3rd grade & up

Subjects: Writing, Language Arts

Purpose & Features: The paid version of Inspiration Maps is feature-rich and recent versions are more and more like the Inspiration software on the computer. Students can choose to make their own diagram/mind map or pick from some pre-loaded templates (these templates are mostly designed for older grades so if you're teaching younger students you can make your own template and Airdrop it to them). Students can quickly create a mind map while also incorporating clip art from the app itself or photos from the Camera Roll. Then, they can convert their diagram into outline form with a click of a button, then export it to a word processing app, like Pages.

Examples of some templates available on the app - most preloaded templates are geared towards older students.

This process helps students who struggle to use the writing process, especially students who don't use their outline to guide their rough drafts, or those who have difficulty seeing the purpose of outlining and would rather just dive into the draft. The transfer of the outline to a word processing app can cut down on the overall workload that can shut down struggling writers. With some work deleting numbers and getting rid of extra spaces, students can convert their outline into a draft.

Yes, there is Kidspiration for younger kids, which has many of the same features of Inspiration, it's just a little more cartoon-y in look and is much more picture-oriented. I would say though if you're really focusing on writing, students can get lost in the "pretty pretty picture" world of Kidspiration fairly easily, and Inspiration might be a better way to go.

Project Ideas: Anything that requires the writing process (brainstorming to outlining to drafting & beyond), reading notes and plot diagrams, visual way to show how concepts are related and processes or timelines in all subjects.

Recently, two 3rd grade teachers, Ms. G and Ms. Riley, had students write a structured persuasive paragraph about why they would be a good elected official. The students followed a paper outline for some of the process, then they typed/dictated their ideas into Inspiration.

It was interesting to see how quickly they caught on to the dictation feature once they figured out there was a microphone button on the iPad keyboard! With a few pointers about how to dictate (you have to talk slowly, but not too slowly, you need to speak in small chunks, you need to articulate a bit more than you do when you are speaking normally), many students were dictating more than they were typing - yes, they are dyslexic - but the dictation feature can definitely benefit any struggling writer.


After we converted their Inspiration diagrams to outlines, and then outlines to text in Pages, they were amazed at how they could transform their outline into a paragraph and not have to retype everything again.

Sometimes, though, dictation with young dyslexic students can be confusing and an eye-opener into the mysterious world of the English language. During class, I came across a student who was visibly frustrated. When I asked him what was wrong, he grumbled, "I think this microphone button doesn't work because I keep saying 'honest' and it spells some word with an 'h' - see!" When I confirmed that the strange word on his iPad was actually the correct spelling of "honest," he looked at me like I had suddenly just grown another head.


Sunday, October 23, 2016

Stop motion videos? Yes, please!

Platform: iPad - paid app (currently $11.99)

Grade Levels: 4th Grade & up

Subjects: Art/Video/could be expanded to nearly every subject

Purpose & Features: iStopMotion for iPad is an app designed to help students create stop motion animations (like claymation movies) and time-lapse recordings. This fall, middle school students created many stop motion masterpieces in Mr. Jones's stop-motion movie elective class - from simple artistic "post-it worm" videos to claymation "feature films."

Project Ideas: Create original narrative films in English, illustrate a certain processes or make an "animated" diagram in Science, film a story and narrate over it (English or foreign language), animate a book or story as an alternative to a book report, illustrate a certain event or conflict in history...

A 6th grade student poses her claymation figure to prep for shooting.
A scene ready to shoot. Shout out to Mr. Jones for the ingenious idea of using the original iPad packaging as "camera" stands! 

Tuesday, October 11, 2016

Want an app that creates easy presentations? Use Haiku Deck!!

Haiku Deck
Platform: iPad; can log in to Haiku Deck online to show the presentation, but not edit presentations

Grade Levels: 4th Grade & up

Subjects: any!

Purpose & Features: Haiku Deck is a free app (pay up for the Pro version with more features) that is much more straightforward and elegant than standard presentation apps. There are a few big differences that sets Haiku Deck apart from apps like Google Slides and PowerPoint. First, students are limited in the amount of text that they can include on a slide. Yes, that means that your students might have to summarize the most important points and put those in their presentation - a great presentation skill to learn early! Also, students only have a choice of so many layout options so that they don't spend all of one class creating rainbow-titles or deliberating over fonts (yes, we've all been there). Last, students can search for images directly in the app which means that they don't have to get lost in the land of Google Image Search! Hooray! Haiku Deck searches a plentiful database of millions of free Creative Commons images and students directly add images to their slides. Students can also add images from their Photo Library if they choose.

Project Ideas: Any project that requires a presentation! But also... vocabulary study cards, "how to" tutorials, plot maps, illustrations of processes, summary of concepts learned in a unit or chapter, etc.

Check out this quick Haiku Deck project I did with my 6th and 8th grade Language students - their assignment was to create a slide for each common prefix we had learned. Some students were able to create a slide deck of 12 or so slides in about 20 minutes!


Monday, October 10, 2016

TEaCH Manifesto

1. Always be curious. 

2. Never stop learning. Let your students teach you.

3. Things change. Tech changes. 

4. Jump in and stop worrying that things won't go perfectly.

5. There's a lot less at stake in learning how to use technology than there is learning how to shape young, impressionable minds. The tech is never the scariest or hardest part of teaching.

6. Listen to what your students actually tell you, not what you think they might tell you.

7. Accept that the status quo might not be the best solution.

8. Remember that any piece of technology is just a tool. Don't use the tool unless it fits your purpose. Don't be a tool, either.

9. Read some but do more.

10. Everyone learns differently. Most of the struggle is finding out how you learn best, and how you can guide others to figure out how they learn best.